

I would like to share my experience creating an image cache using NGINX and the numerous features it provides.
Working with images in particular introduces complexities regarding storage as images with high resolution can easily use up all the space on a specific machine. For many reasons, NGINX becomes a suitable choice as it provides functionalities to handle image data along with the performance it guarantees as a multi-purpose web server. Specifically, I will be using the following three built-in modules to build a robust image cache: http_proxy_cache, image-filter, and consistent-hashing.
To demonstrate a working example, I share the repository that includes the necessary configuration files and commands to spawn up a cluster of nginx nodes orchestrated using docker swarm.
Repository link: https://github.com/zealotjin/image-cache
Nginx Docker
To form a docker swarm, I thought it would be easier to deploy containers with the NGINX configuration file inside, thus I wrote a simple Dockerfile.
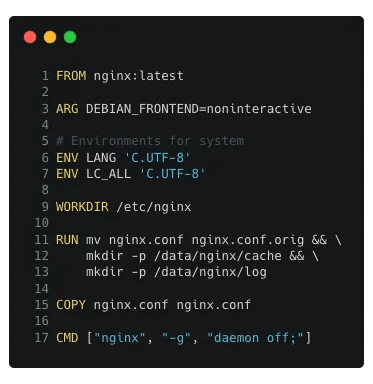
The Docker image builds upon using the nginx docker image provided on the Docker hub. When building the image, the default.conf file gets replaced with the one that I had written (nginx.conf).
The Docker image can be built using the command:
$ docker build -t image-cache:v1 .
Nginx Configuration
There are four main parts to the configuration file for the image cache.

Part 1. Basic NGINX configuration
To support multiple connections, it is normal to spawn worker processes, and the auto option spawns according to the number of cores of the machine. Then, under an HTTP server that listens to port 80, a location mapping is introduced that proxy_pass the request to the actual server that serves the image binary.
Part 2. Cache related configuration
Using the cache-related configurations (proxy_cache_*) we define the behavior of the caching abilities. Starting with proxy_cache_path, we specify the directory to store the cache data, levels, and keys_zone size. For more information on these options, please refer to the documentation.
Reference:
Part 3. Image-filter module
The image-filter module is used to apply various transformations to the image binary that gets stored as part of the cache. This is optional but something to consider when storing images. The size and quality of the image have an impact on the size of storage and this can be used to handle impractically large images. This module can be used by specifying the import to the shared library (ngx_http_image_filter_module.so)
Reference:
Part 4. Consistent Hashing
Consistent Hashing is an implementation for distributing data across nodes. Not only does this method provide an even distribution of data, but also assures fault tolerance to the cluster of nodes. Refer to the addendum at the end of this article explaining the added benefits of using consistent hashing.
The configurations to form a cluster using consistent hashing requires a definition of servers as specified in lines 15–20. As for retrieving cached data, you can hit any of the end-points of the nodes because the Nginx servers will be able to calculate to which server to re-route the request. (in th example, it uses the $request_uri)
Reference:
- Documentation: https://www.nginx.com/resources/wiki/modules/consistent_hash/
- Explanation: https://docs.nginx.com/nginx-management-suite/acm/how-to/policies/http-backend-configuration/#balancing-algorithms
Docker Swarm Deployment
This assumes that you pushed your docker image to a registry; similar to Docker hub. In addition, the nodes need to be properly configured such that a swarm is formed. Next, use the command below to deploy containers for the image cache.
$ docker service create --mode global --name nginx --with-registry-auth \
    --publish published=80,target=80,mode=host \
    image-cache:v1
Note, docker swarm has its own load balancing, thus you need to turn this off to avoid unnecessary rebalancing. This is done by supplying the mode=host parameter when mapping ports.
Wrap-up
Merely with 46 lines of code, we have created an image cache that can scale reliably and is fault-tolerant. In practice, I extended the code base to form an image cache of 10 nodes with additional configurations like keepalive connections, proxy_buffer settings to fit expected image sizes, and proxy_hide_header to reduce unnecessary header data stored as part of the cache. As a result, the cache was able to serve images at the rate of around 1000 requests per second.
Addendum. Why Consistent Hashing?
Consistent-Hashing is a scheme that can be used to distribute load evenly across multiple servers. Naturally, as the requests get cached in the NGINX servers, the image binaries are stored evenly when using this method.
The reason for using consistent hashing over other balancing algorithms can be summarized into three main reasons: deterministic, evenly distributed, and fault-tolerant. There are many resources explaining the implementation details of the scheme but essentially, the data is spread across multiple servers in a hash ring. With this setup, when new servers are added or a node failure occurs, the reshuffling of data is reduced because the data in a specific segment of the hash ring would be shifted to the next node. Compare this to a simpler method of taking the modulo of a hash value, with a change in the value of the divisor (number of nodes), the whole data needs to be reshuffled because the server assignment will have changed. (i.e 127 % 5 != 127 % 4)
With the added benefit of having the algorithm readily available in the NGINX application, consistent hashing proves to be highly usable when creating a distributed image cache.

Leave a reply to Rita Akter Cancel reply